Most of my shopping has been completed and only those few last bits need to be done. Have I wrapped yet? Well, let us not discuss that, I have a big helper that does most of it when he arrives at City House...my sweet Mister.
Speaking of my sweet Mister, he has some sweet things he wanted to pass on to you. He had intended to do a tutorial on peppermint bark for you all but saw the Barefoot Contessa on Saturday do a nice French Chocolate Bark...so he decided to do his own adaptation of it. So, yesterday afternoon, he tied on his apron and set to it as I followed him around with my camera.
Let us start with the ingredients and move on to the process. Here is the link to Barefoot Contessa's recipe that he started with if you care to use this.

The Misters French Chocolate Bark
8 ounces semisweet chocolate chips
8 ounces very good bittersweet chocolate, finely chopped
1 cup whole roasted, salted cashews
1 cup chopped dried apricots
1/4 cup chopped dried cherries
1/4 cup dried blueberries

The first thing that the Mister did was to draw a rectangle 9" x 10" on a piece of parchment paper as a guide to spread the melted chocolate on, making sure to turn the paper over after, to not get pencil lead on the goodies.

He gathered all of the ingredients and set to work.

Here is the method he used to melt the chocolate. A medium sized saucepan with a few inches of simmering water in it and a medium sized bowl on top. Make sure to not have a hard boil and the bottom of the bowl should not touch the water.
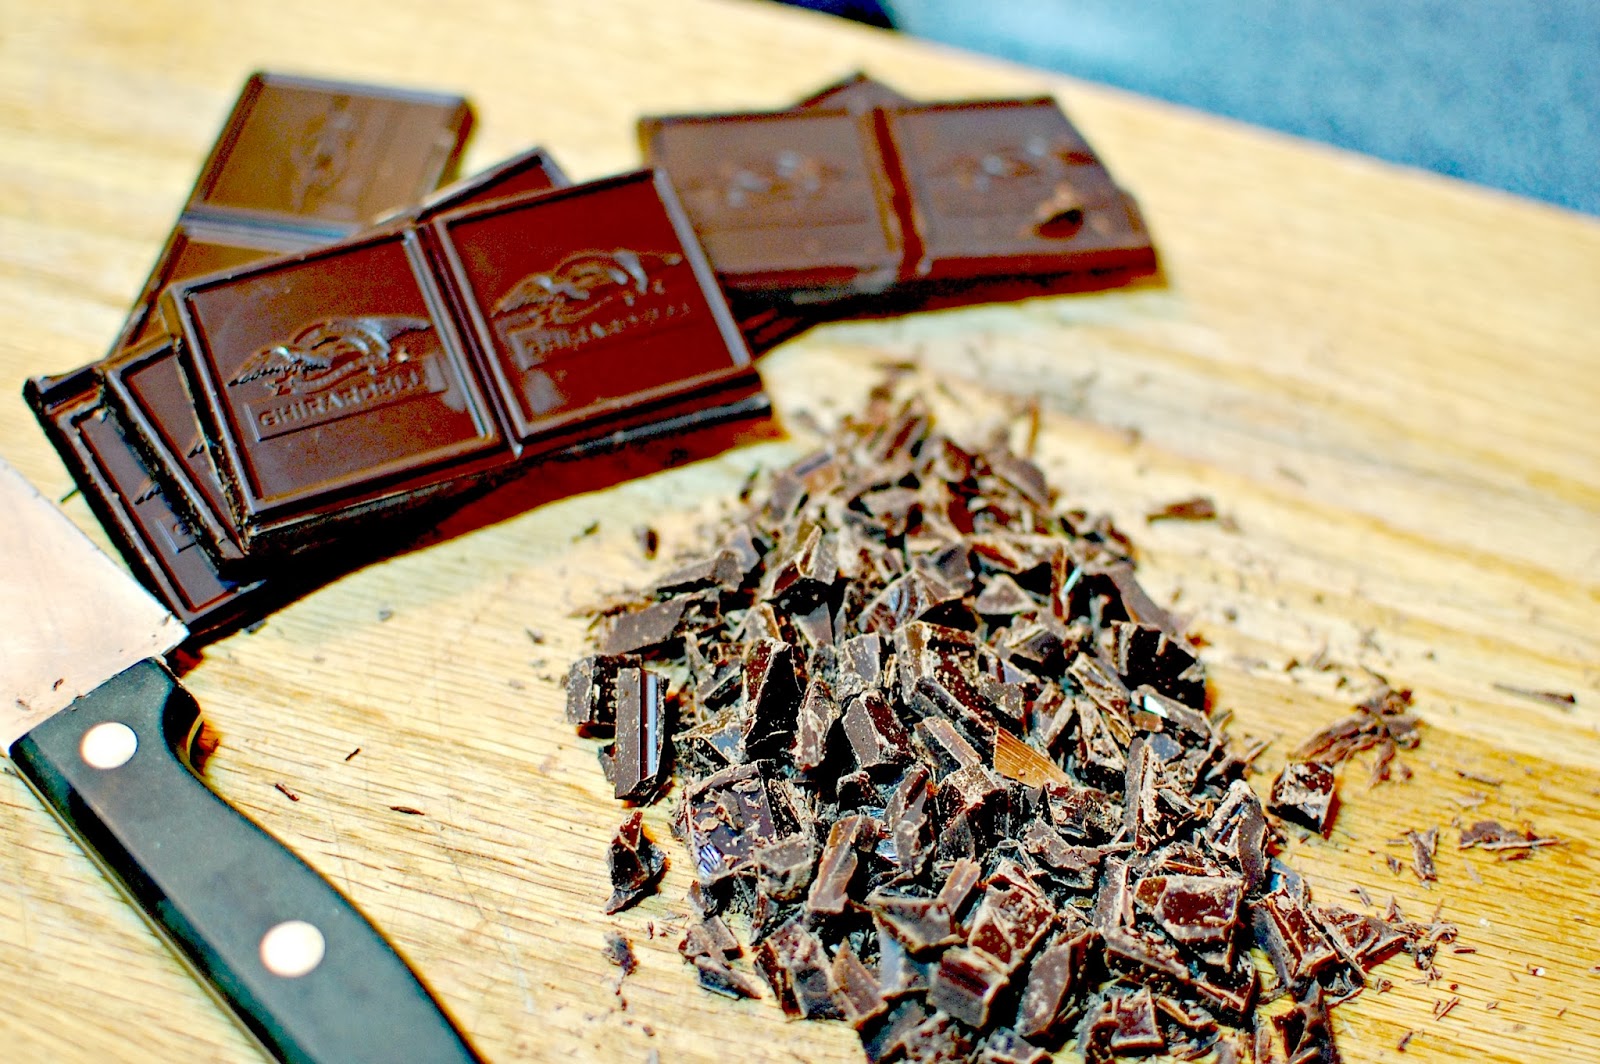
He finely chopped the Bittersweet chocolate.....

adding it to the chocolate chips in the pan. He then checked to make sure the water was at a very low simmer.


Finding that he didn't need to chop the blueberries, he decided to take a sampling to make sure they were good.

When the chocolate was almost all melted he took it off of the stove and stirred a bit more until it was smooth and then poured it on to the sheet and smoothed it out to the 9 x 10 markings.

Next he evenly distributed the mixture over the chocolate and gently pressed to make sure all was in tact.

After letting it set for at least 2 hrs. he took to cutting it in to pieces.

Finally he put them in their little papers and into a festive tin....he will be sharing it at work on Thursday.
Thank you honey for sharing with all of us today.
*
Well friends, I hope you enjoyed the tutorial and perhaps may even be able to put it to use someday. I must say it was very easy to make and I will be doing some batches also to add to my Christmas goodie tins.
Have you been making any candy?
xo
18 comments:
Oh yum! Please thank your Mr. for sharing his technique! No candy this year, but Pony Girl and I have grand plans for cookies and a baked from scratch gingerbread house! I'm looking forward to the wonderful smells that will take over our house this weekend!
PS. Love your festive and pretty header.
Oh my goodness, this looks delicious!! I've only made one type of cookie so far. I have had company for three weekends in a row and can't seem to get things done.
Tell your Mister Thank You! This looks like a delightful treat and I'm thinking gift! Who could resist?
So yummy! Thanks for sharing! I used to do peppermint bark with almonds and that was always tasty. Wishing you a sweet day! xo Heather
What time should we be at work on Thursday??? Sounds like a very tasty treat:@)
What a wonderful Mister! He did GOOD!!! Looks delish! I love it when the guys get into the "blog thing" Hehe! Blessings~~~Roxie
I have great respect for the cook that samples the ingredients before preparing something to serve to others-very thoughtful indeed!
It sure looks yummy and fairly easy.
That looks so easy and so yummy too! Are you going to make some for our Christmas Eve party? Hint, hint....LOL!
I think even I could do this!
Thanks to both of you for this excellent tutorial.
Merry, merry.
xo J
LOVE the little paper wrappers for the candy... very professional looking ;)
~Chris
This looks and sounds so delicious! Pinned it to my sweets board and will definitely be making this next week as our Christmas treat.
I have not been doing candy (just lots of other baking) - but this sounds wonderful! Thanks for stopping by my blog!
yummy! looks divine.
Sherry,
You blessed me today with your comment . So much truth there .I will also pray for you . Thanks for being a bright star in the night sky for me.
Mmm, this looks heavenly! I love seeing all of the sweet treats people are making this time of year. :)
Ohhhh...now that looks wonderful...such yummy ingredients! I was thinking of opening Rolos, popping them on a pretzel and topping with a pecan. Shhhh! Don't even mention this to your husband. He'll be aghast.
Merry Christmas!
Hi Sheri. thank you for your comment and prayers from your visit to my little blog. We've cleaned up some but the rest will have to wait til spring.
I love your description of you on your blog by the way. So cute and original..:)
Have a wonderful christmas!
Post a Comment